
Preface

Standard Operation
To Lock the Door
- Pull your door closed, the lock is always in a ”locked” state from the outside.
To Unlock the Door
- Enter a pin code, swipe RFID tag or Bluetooth app.
- The internal handle is always free passage.
To Exit
- Rotate the internal handle downwards. The internal handle is always in an "unlocked state"
Operating Function Setting
Single Opening Mode
Either 1 card or 1 pin code will open the door.
Enable Single Opening Mode # 141
| Format | ** <Management Code> # 141 # |
| Example |
** 888 888 # 141 # |
| Example Result |
Either 1 card or 1 pin code will be required to open the door. |
| Exit Programming |
Press ** |
Dual Opening Mode
Enable Dual Opening Mode # 142
| Format |
** <Management Code> # 142 # |
| Example |
** 888 888 # 142 # |
| Example Result |
Either 1 card or 1 pin code will be required to open the door. |
| Exit Programming |
Press ** |
Features
Free Passage Mode
Free Passage Mode will leave the door in an “unlocked” state until deactivated.
Enable Free Passage
| Format | Press and hold ‘#’ for 3 seconds after the door was opened |
| Result | The door is in an “unlocked” state until deactivated |

Disable Free Passage
| Format | Wake the keypad. Press and hold ‘#’ for 3 seconds or present any valid card to the lock to disable |
| Result | The door is in a “locked” state |
Keypad Lockout
Notification Sounds
| Successful attempt |
1 long beep |
Green 7, Red 8 |
|
Unsuccessful attempt |
2 short beeps |
Red 8 |
|
Keypad Lock |
The keypad will lockout for 1 minute if a pin code was entered incorrectly 3 times |
|
|
Low Battery |
Alarm sounding before entry |
|
Management Instructions – Local

Management Code
Specifications
- Capacity: 1
- The management code must be 6 digits only and cannot unlock the door.
- Keep the management code secure
Enter Management Settings
|
Format |
** <Management code> # |
|
Example |
** 888888 # |
|
Example Result |
You are now in management settings and can use management functionality such as adding PINs, cards, and modifying the lock |
|
Exit Programming |
Press ** |
Set Management Code # 5
| Format | ** <Management code> # 5 <New Management Code> # |
| Example | ** 888888 # 5 999 999 # |
| Example Result | This has modified the management to 999 999 |
| Exit Programming | Press ** |
Pin Code
Specifications
- Capacity: 100
- Pin ID: Each user pin code has an assigned ID number.
- ID range: 00 – 99 [2 digits]
- User code length: 4-6 digits
Unlock the door by pin code
- Touch lock to wake up the keypad,
- Enter pin code [4-6] digits,
- Press ‘#’, Door will unlock.
- Capacity: 100
- Frequency: Mifare S50 1k 13.56MHz
- Each User RFID Card has an assigned ID number. ID range: 00 – 99 [2 digits]
- Swiping the card over the lock face
- Door will unlock
- Remove the lock from the door.
- Ensure the lock is powered then press and hold the switch inside the slot on the front handle.
- Release the switch when you hear the lock respond with a buzz tone
- Ensure that the ACR is powered
- On the back of the ACR, press and hold the button inside of the top left hole
-
You can reverse the handles by shifting the tab downwards by using a small key (screwdriver). See the video below.
-
As above disassembling the lock may void your warranty.
Example: 1 2 3 4 5 6 #
Example: 2 3 4 5 #
Set Pin Codes #6
| Format | ** <Management Code> # 6 <User ID> <User Pin Code> # |
| Example | Example 1: ** 888 888 # 6 00 223344 #…. Example 2: *** 888 888 # 6 01 2580 # |
| Example Result | This has added a user pin code ID:00 223344 and ID:01 2580 |
| Exit Programming | Press ** |
Successful – 1 long beep. Unsuccessful – 2 short beeps.
Delete Individual User Pin Code #7
To delete an individual user pin code you need to know the User ID.
| Format |
** <Management Code> # 7 <User ID> # |
| Example |
** 888 888 # 7 01 # |
| Example Result |
This has deleted User Pin Code 2580 from the lock. All other pin codes remain in memory. |
| Exit Programming |
Press ** |
Successful – 1 long beep. Unsuccessful – 2 short beeps.
Delete ALL User Pin Codes #666
This deletes ALL User Pin Codes except the Management Code.
| Format |
** <Management Code> # 666 # |
| Example |
** 888 888 # 666 # |
| Example Result |
This has deleted ALL pin codes from the lock. No pin codes remain except the management code |
| Exit Programming |
Press ** |
Successful – 1 long beep. Unsuccessful – 2 short beeps.
RFID Card & Fob
This will add the RFID Card or FOB to access the door lock.
Specification
Unlock the door by RFID card or Fob
Set User RFID Card #2
| Format |
** <Management Code> # 2 <User ID> # <Swipe RFID Card> |
| Example |
Example 1: ** 888 888 # 2 00 # <Swipe Card 1> …Example 2: ** 888 888 # 2 01 # <Swipe Card 2> |
| Example Result |
Result: This has added a User RFID Card ID:00 |
| Exit Programming |
Press ** |
Successful – 1 long beep. Unsuccessful – 2 short beeps.
Delete User RFID by ID #3
To delete an individual user RFID you need to know the User ID.
| Format |
** <Management Code> # 3 <User ID> # |
| Example |
** 888 888 # 3 01 # |
| Example Result |
This has deleted User RFID Card 01. All other User RFID Cards remain in memory. |
| Exit Programming |
Press ** |
Successful – 1 long beep. Unsuccessful – 2 short beeps.
Delete ALL User RFID #444
This deletes ALL user RFID.
| Format |
** <Management Code> # 444 # |
| Example | ** 888 888 # 444 # |
| Example Result | This has deleted ALL User RFID Card from the lock |
| Exit Programming | Press ** |
Successful – 1 long beep. Unsuccessful – 2 short beeps.
Delete User RFID by Reading Card #8
To delete an individual user RFID if you don’t know the ID, you conduct this method.
| Format |
** <Management Code> # 8 # <Swipe RFID Card To Delete> |
| Example | ** 888 888 # 8 # <Swipe RFID Card> |
| Example Result | This has deleted User RFID Card which was swiped. All other User RFID Cards remain in memory. |
| Exit Programming | Press ** |
Successful – 1 long beep. Unsuccessful – 2 short beeps.
Delete User RFID by Continuously Reading Cards #888
To delete a series of RFID in one step.
| Format |
** <Management Code> # 888 # <Swipe Card 1> <Swipe Card 2> … |
| Example | ** 888 888 # 888 # <Swipe Card 1> <Swipe Card 2>… |
| Example Result | This has deleted the User RFID Cards which were wiped. All other User RFID Cards remain in memory. |
| Exit Programming | Press ** |
ACR Customization
Keypad Light Timeout: (Keypad lights will turn off after a few seconds)
| Format |
** <Management Code> # 151# |
| Example |
** 888 888 # 151# |
| Example Result |
In standalone mode turn the Blue Light off |
| Exit Programming |
Press ** |
Successful – 1 long beep. Unsuccessful – 2 short beeps.
Keypad Light No Timeout: (Keypad light will always remain on)
| Format |
** <Management Code> # 152 # |
| Example |
** 888 888 # 152 # |
| Example Result |
In standalone mode turn the Blue Light on |
| Exit Programming |
Press ** |
Successful – 1 long beep. Unsuccessful – 2 short beeps.
Keypad Sleep Mode: (Keypad will enter sleep mode after keypad entries are complete)
| Format |
** <Management Code> # 161 # |
| Example |
** 888 888 # 161 # |
| Example Result |
In standalone mode always have the keypad off |
| Exit Programming |
Press ** |
Successful – 1 long beep. Unsuccessful – 2 short beeps.
Keypad No Sleep Mode: (Keypad constantly lit)
| Format |
** <Management Code> # 162# |
| Example |
** 888 888 # 162# |
| Example Result |
In standalone mode always have the keypad on |
| Exit Programming |
Press ** |
Successful – 1 long beep. Unsuccessful – 2 short beeps.
PIN Code Input Delay Time: 0.5 second (This is the delay time after the keypad is lit and before accepting a pin code entry)
| Format |
** <Management Code> # 171 # |
| Example |
** 888 888 # 171# |
| Example Result |
In standalone mode; set a wait time of 0.5 seconds before accepting first keypad try |
| Exit Programming |
Press ** |
Successful – 1 long beep. Unsuccessful – 2 short beeps.
PIN Code Input Delay Time: 1.0 second (This is the delay time after the keypad is lit and before accepting a pin code entry)
| Format |
** <Management Code> # 172# |
| Example |
** 888 888 # 172# |
| Example Result |
In standalone mode; set a wait time of 1 second before accepting first keypad try |
| Exit Programming |
Press ** |
Successful – 1 long beep. Unsuccessful – 2 short beeps.
PIN Code Input Delay Time: 1.5 second (This is the delay time after the keypad is lit and before accepting a pin code entry)
| Format |
** <Management Code> # 173# |
| Example |
** 888 888 # 173# |
| Example Result |
In standalone mode; set a wait time of 1.5 seconds before accepting first keypad try |
| Exit Programming |
Press ** |
Successful – 1 long beep. Unsuccessful – 2 short beeps.
Factory Reset
This removes ALL programmed data and resets Management Code back to default.
This will also reset the lock which was activated on the app. Please re-activate the lock from the app to continue using the app. Factory Reset By Keypad #199
| Format |
** <Management Code> # 199 # |
| Example |
** 888 888 # 199# |
| Result |
All data has been removed and the lock has defaulted back to Initialisation mode |
Successful – 1 x rising tone with red ‘8’ Unsuccessful – 2 short beeps.
Factory Reset by Reset Switch on Neo
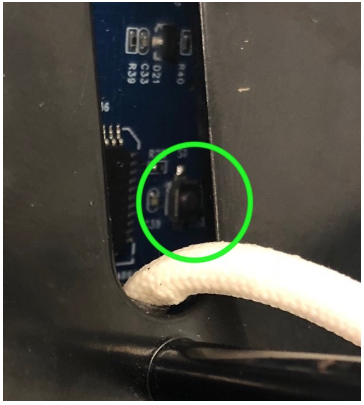 Neo Front Handel. Reset Switch on the back
Factory Reset by Reset Switch on Neo Access Control
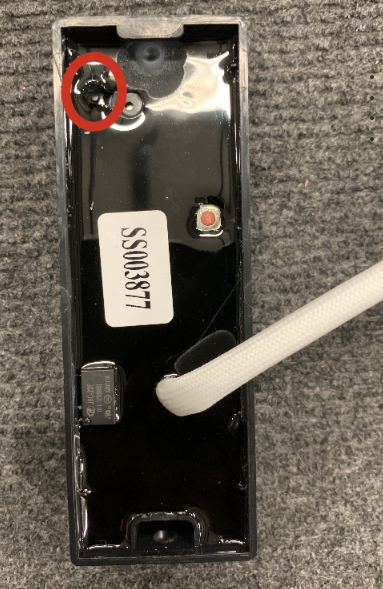 ACR Reset button location
Other Functions
Reversing The Handle Direction
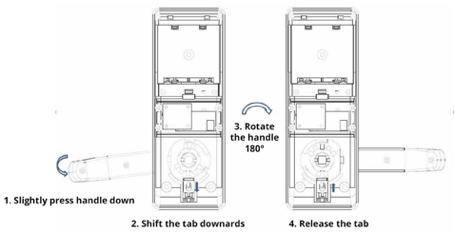 Rear Handle. Figure 4
|
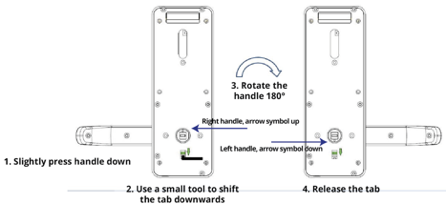 Front Handle. Figure 5
|
Mechanical Key Override
- Open the plastic cover on the front facing part of the door handle
- Insert and rotate the key 90 degrees
- The cards will be numbered.
- Before the upgrade, ensure that the lock is reset (Using a System Card with a Clear function, or by dialing ** 888 888 # 199 # into the lock.
- Present the card labelled 1 to the lock, and wait for a second beep.
- Present the rest of the cards in sequence, until a beep is heard between each one.

Firmware Upgrade (NEO Lock)